9. Development Documentation#
This document explains how Norse is structured programmatically, intended for audiences that either 1) wants to build their own models or 2) wishes to understand how Norse works. To achieve this, we will explain the architecture of Norse, describe the underlying concept of computational graphs, and finally show an example for a hypothetical biological/dynamical system.
9.1. Architecture of Norse#
Norse closely follows the architecture of PyTorch in that the rudimentary functionality is implemented in the functional package. Modules, then, are a layer of “syntactic sugar” around the functionality, so that they compose better.
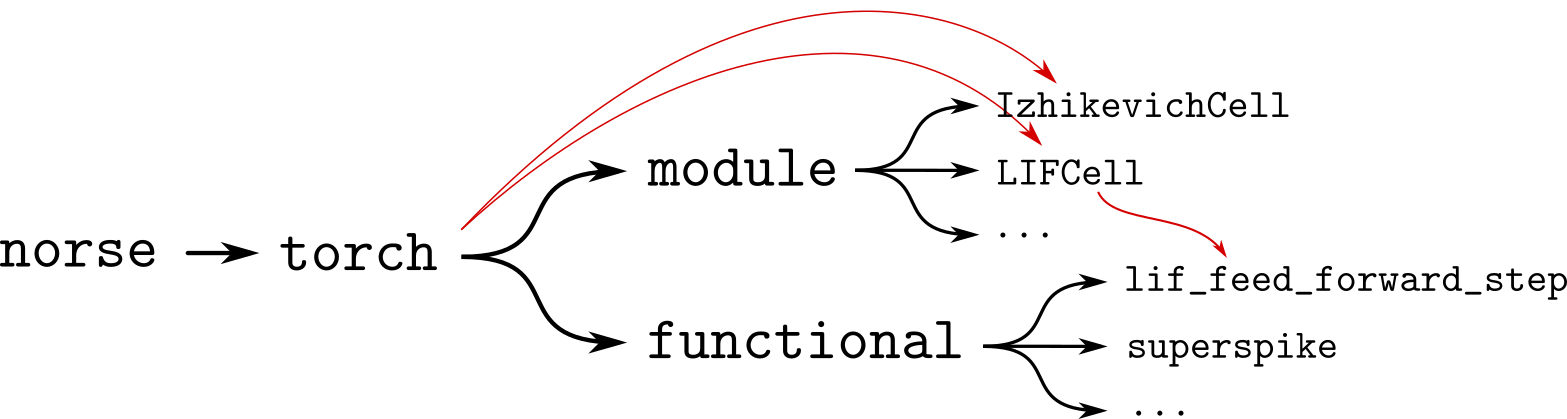
Fig. 9.1 The architecture of norse read from left to right. Note that the directory structure (black) is circumvented by the import hierarchy (red), so that users can import LIFCell from the norse.torch package directly.#
Figure Fig. 9.1 shows the file directory structure in black, where users can access the fundamental code for stepping a leaky integrate-and-fire neuron by typing norse.torch.functional.lif_feed_forward_step.
The LIFCell module can similarly be accessed via norse.torch.module.LIFCell.
As you may know, the LIFCell is essentially a modular wrapper of the lif_feed_forward_step function.
Therefore, it is natural that the LIFCell references the functional part, which is indeed the case: all the functional components are re-used in their modular counterparts.
When implementing a new module, it is therefore important to realize that the functional parts should be implemented first. Once that part is built and tested, the module can be built which, at this point, should be rather straightforward boilerplate code.
9.1.1. Import shortcuts#
It is also worth mentioning that importing norse.torch.module.LIFCell is rather tedious.
To accommodate this, we have added import shortcuts, so the user can write the following:
import norse.torch as snn
snn.LIFCell
This is visualized in figure Fig. 9.1 by the red arrows, showing how the imports can “jump” over directories.
In practice, this is implemented in the __init__.py files in each folder.
See the __init__.py file for the norse.torch.module package as an example.
9.2. Computational graphs for neuron models#
For any neuron model to be useful in Norse, it needs to be differentiable. It is therefore imperative that the computations that describe any model can be derived. This would normally be cumbersome to describe computationally, but this is problem is luckily solved by PyTorch via automatic differentiation.

Fig. 9.2 A visualization of a computational graph from PyTorch’s documentation.
The figure demonstrates how a computation is broken down into its constituent parts, so that certain parameters (w and b) can be isolated for later optimization.#
This means that any code you write will be automatically differentiable - unless it contains discontinuities. Unfortunately, that happens rather often in spiking models, which is why we have implemented a number of surrogate gradient functions that can be applied.
Specifically, the threshold function approximations are available in norse.torch.functional.threshold and its application can be studied in the simplified LIF box function.
Please note, however, that the threshold API may be subject to change.
9.3. Example implementation#
Imagine the following dynamic where a state \(s\) is being innervated by some input \(i\):
And that we will spike if \(s > 1\).
This has a straightforward implementation in Python (please note that input_tensor may be a tensor and not a scalar!)
def my_dynamic(input_tensor, state=0):
    state = state + input_tensor
    # Spike if state > 1
    spikes = ...
    return spikes, state
Note that we are returning a tuple since we need to re-use the state in the next integration step.
To resolve the discontinuity problem above, we can apply the threshold module:
from norse.torch.functional.threshold import threshold

def my_dynamic(input_tensor, state=0):
    state = state + input_tensor
    # Note that the threshold interprets values > 0 as a spike
    #   - alpha is a parameter for the superspike method, ignore for now
    spikes = threshold(1 - state, method="superspike", alpha=100)
    return spikes, state
You can now use your dynamics in a loop!
state = 0
for i in range(100):
    mock_data = torch.randn(16, 2, 10)
    z, state = my_dynamic(mock_data, state)
...
Final step can be prettying it up a bit by adding a Parameter object to keep track of your hyperparameters.
from typing import NamedTuple
import torch
from norse.torch.functional.threshold import threshold

class MyParameters(NamedTuple):
    method: str = "superspike"
    alpha: torch.Tensor = torch.as_tensor(100)


def my_dynamic(input_tensor, state=0, p: MyParameters=MyParameters()):
    state = state + input_tensor
    # Note that the threshold interprets values > 0 as a spike
    #   - alpha is a parameter for the superspike method, ignore for now
    spikes = threshold(1 - state, method=p.method, alpha=p.alpha)
    return spikes, state
Same thing can be done for the state if necessary. More inspiration can be found in existing neuron models, such as the Izhikevich model.